/bin/bash -c “$(curl -fsSL https://raw.githubusercontent.com/Homebrew/install/HEAD/install.sh)"
 1
 2
 3
 4
 5
 6
 7
 8
 9
10
11
12
13
14
15
16
17
18
19
20
21
22
23
24
25
26
27
28
29
30
31
32
33
34
|
# 替换 USTC中科大 镜像
echo 'export HOMEBREW_BREW_GIT_REMOTE="https://mirrors.ustc.edu.cn/brew.git"' >> ~/.zshrc
source ~/.zshrc

#使用 $USER 作为变量代替用户名避免用户名不同导致失败的情况
(echo; echo 'eval "$(/opt/homebrew/bin/brew shellenv)"') >> /Users/$USER/.zprofile
eval "$(/opt/homebrew/bin/brew shellenv)"


# used to edit .zshrc easily
brew install --cask visual-studio-code


# 8无法安装在m1上, 选择安装jdk11
brew install openjdk@11

sudo ln -sfn /opt/homebrew/opt/openjdk@11/libexec/openjdk.jdk /Library/Java/JavaVirtualMachines/openjdk-11.jdk

#If you need to have openjdk@11 first in your PATH, run:
echo 'export PATH="/opt/homebrew/opt/openjdk@11/bin:$PATH"' >> ~/.zshrc

#For compilers to find openjdk@11 you may need to set:
export CPPFLAGS="-I/opt/homebrew/opt/openjdk@11/include"

# 隐藏shell用户名和主机名:这是对shell进行操作.所以对iterm2和terminal都能生效,所以不用担心在terminal里面执行无法看到iterm2的效果
echo 'PROMPT="%1~ %# "' >> ~/.zshrc
source ~/.zshrc

brew install golang maven

brew install --cask maccy keka iina google-chrome  utools macs-fan-control qq wechat apifox  monitorcontrol mos snipaste wpsoffice-cn orbstack
|
homebrew中科大源
https://mirrors.ustc.edu.cn/help/brew.git.html
如果一开始就无法从 github 拉去下载文件, 那么就通过上面中科大的链接中的镜像路径替换掉脚本的第一行
iterm2 or 其他插件
 1
 2
 3
 4
 5
 6
 7
 8
 9
10
11
12
13
14
15
16
17
18
19
20
|
brew install --cask iterm2
# 后续可使用iterm2 进行操作, 也可继续在 terminal 内操作

# 在 terminal 中打开 iterm2
#open -a iTerm


# install oh-my-zsh
sh -c "$(curl -fsSL https://raw.githubusercontent.com/robbyrussell/oh-my-zsh/master/tools/install.sh)"


cd ~/.oh-my-zsh/custom/plugins/
git clone https://github.com/zsh-users/zsh-autosuggestions


cd ~/.oh-my-zsh/custom/plugins/
git clone https://github.com/zsh-users/zsh-syntax-highlighting.git
code ~/.zshrc
#  手动在 vscode 上修改plugin, 添加 zsh-syntax-highlighting和zsh-autosuggestions, zsh-syntax-highlighting一定要写在最后
|
简书:Mac中iTerm22+Oh My Zsh安装、配置和使用
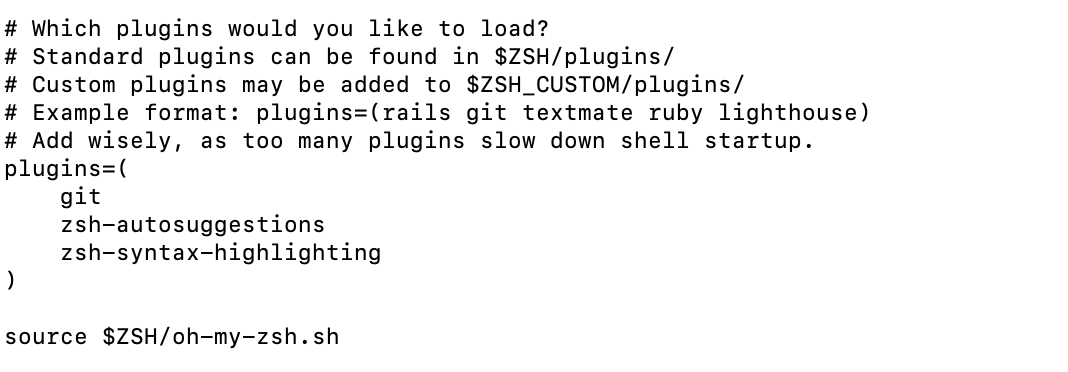
安装插件后再 .zshrc 中写好插件名(如下图):

设置 Chrome 暗黑模式: 在浏览器地址栏写入 chrome://flags/#enable-force-dark 就能选择开启关闭或跟随系统主题了
给 zsh 写几个函数
 1
 2
 3
 4
 5
 6
 7
 8
 9
10
11
12
13
14
15
16
17
18
19
20
21
22
23
24
25
26
27
28
29
30
31
32
33
34
35
36
37
38
39
40
41
42
43
44
45
46
47
48
49
50
51
52
53
54
55
56
|
# 使用方式: 在命令行中写下 lazygit "My commit msg."   然后"My commit msg." 便会作为 commit 消息
function lazygit() {
    git add .
    git commit -a -m "$1"
    git push
}


# 使用方式: newhugo "your_directory_name" "Your Title Here"
# 中文名要用双引号, 英文可以直接写
function newhugo() {
  # 检查是否提供了足够的参数(目录名和标题)
  if [ -z "$1" ] || [ -z "$2" ]; then
    echo "Usage: create_md_with_dir <directory_name> <title>"
    return 1
  fi

  # 定义固定目录和新目录的完整路径
  local base_dir="/Users/asher/code/blog_source/content/post"  # 替换为您的固定目录路径
  local new_dir="$base_dir/$1"
  local title="$2"

  # 创建新目录
  mkdir -p "$new_dir" || return 2

  # 创建 index.md 文件并写入内容
  local current_time=$(date +"%Y-%m-%dT%H:%M:%S%z")  # 获取当前时间并格式化
  # 由于 macOS 的 date 命令和 GNU date 命令有所不同,我们需要进行适配
  # macOS 需要使用 `date +"%Y-%m-%dT%H:%M:%S%z"` 并手动插入冒号来符合 ISO 8601
  current_time=${current_time:0:22}:${current_time:22}
  local index_md="$new_dir/index.md"
  cat > "$index_md" <<EOF
+++
author = "Asher"
title = "$title"
date = "$current_time"
description = ""
draft = false
+++

EOF

# 使用 Typora 打开 index.md 文件
  open -a Typora "$index_md"

  # 返回成功
  return 0
}


function lazytypora() {
    cd ~/code/blog_source
    git add .
    git commit -a -m "$1"
    git push
}
|
设置立即显示Dock(无动画)
第一行设置开启 dock 隐藏, 第二行设置立即显示 dock, 第三行重启 dock 使得设置生效
1
2
3
|
defaults write com.apple.dock autohide -bool true
defaults write com.apple.dock autohide-time-modifier -float 0
killall Dock
|
一些在brew之外下载的软件
Intellij-idea
GoLand
DataGrip
右键专业助手
为了解决在 Finder 中右键连文件都创建不了的缺陷😒
长这样

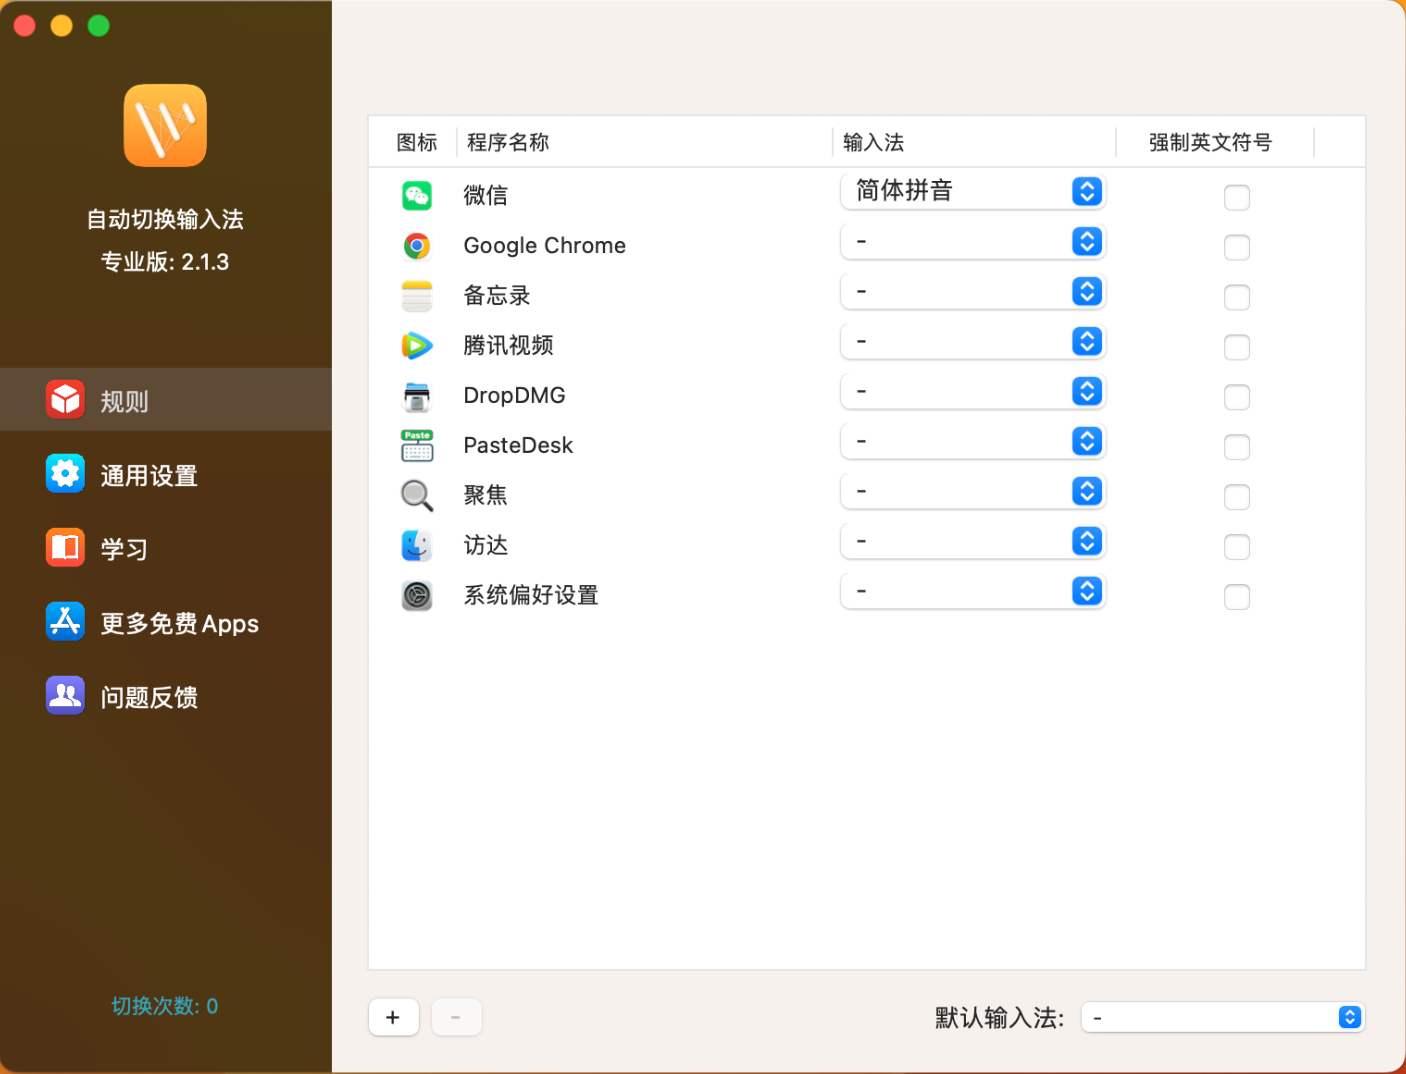
输入法控制
不再推荐该软件, 因为有一定概率导致屏幕出现小黑块
为了解决某些软件自动把我的搜狗输入法切成系统原生 abc 输入法
虽然可以通过 plist 等工具直接把 abc 输入法删除, 但是不确定删除之后进入系统安全模式时还能否正常使用键盘

brew安装的软件说明
keka 解压缩
monitorcontrol 控制外接显示器亮度
iina 视频播放器
mos 触控板与鼠标滑动逻辑分离
一些还不错的mac配置文章
https://44maker.github.io/wiki/Mac/index.html
homebrew 下载慢
参考这篇文章的方法二 https://developer.aliyun.com/article/1326823


